TM 1-1520-238-23
4-292
4.89.
NO. 1 ACTUATING CYLINDER REMOVAL/INSTALLATION – continued
4.89.4. Cleaning
a. Wipe removed and attaching parts with a
clean rag.
4.89.5. Inspection
a. Check actuator, clevis, and nipple for cracks
and stripped threads. None allowed.
b. Check actuator, clevis, and nipple for corro-
sion (para 1.49).
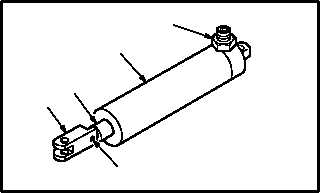
4.89.6. Installation
a. Install clevis (5) on actuator (2).
(1) Install new cotter pin (15) through clevis (5)
and rod (16).
b. Lubricate tapered threads of union (3). Use
petrolatum (item 138, App F).
c. Install tapered end of nipple (3) in actuator (2).
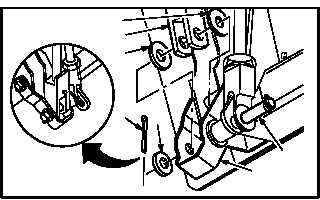
d. Install actuator clevis end (5) in idler (6).
(1) Pull pin (8) forward until clear of idler (6).
(2) Position and hold clevis (5) in idler (6).
(3) Install clevis (5) in idler (6) with one washer
(9) on each side.
(4) Push pin (8) through washers (9) and clevis
(5) until seated in idler (6).
(5) Install washer (9) on pin (8) aft of idler (6).
(6) Install new cotter pin (7) in pin (8).
GO TO NEXT PAGE
M04-1031-6
3
2
15
5
16
M04-1031-7
9
5
9
7
9
6
8
VIEW
ROTATED