TM 1-1520-238-23
13-56
13.18.
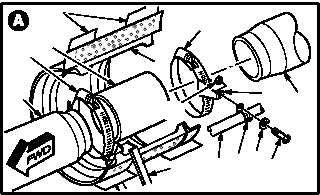
AIR DUCT NO. 2 REMOVAL/INSTALLATION - continued
c. Remove defog hose (1) and clamp (2) from
bracket (3).
(1) Remove screw (4), washer (5), and nut (6).
(2) Remove hose (1) and clamp (2).
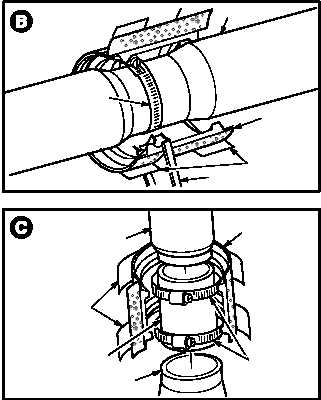
d. Remove three cuffs (7) from air duct No. 2 (8)
and air ducts (9) and (10).
(1) Remove tape (11) and separate cuff (7) vel-
cro strips.
(2) Remove cuffs (7).
e. Remove duct (8) from ducts (9) and (10).
(1) Loosen five clamps (12) from two sleeves
(13) and brackets (3), (14), and (15).
(2) Remove bracket (3), clamps (12), and
sleeves (13).
(3) Remove duct (8).
13.18.4. Cleaning
a. Wipe removed and attaching parts with a
clean rag.
13.18.5. Inspection
a. Check ends of ducts, clamps, and brackets
for excessive wear, cracks, or breaks (para
13.1).
b. Check sleeves, cuffs, and insulation on ducts
for rips or tears (para 13.1).
c. Check rubber seals at both ends of ducts for
chafing, cuts, or fraying (para 13.1).
d. Check removed and attaching parts for corro-
sion (para 1.49).
GO TO NEXT PAGE
12
8
14
7
4
1
M04-61 1-12
13
12
3
VIEW ROTATED
9
11
6
2
5
8
7
M04-61 1-13
12
15
11
8
12
M04-61 1-14
13
11
10
7