TM 1-1520-238-23
Change 3
11-1153
11.272.
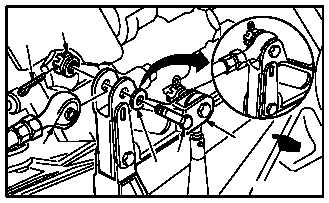
DIRECTIONAL F.S. 542 BELLCRANK REMOVAL/INSTALLATION – continued
c. Install connecting link (3) on bellcrank (4).
Torque nut (2) 30 to 40 INCH-POUNDS.
(1) Aline link (3) with bellcrank (4).
(2) Install bolt (1) through washer (6), bellcrank
(4), and link (3).
(3) Check fit of self-retaining bolt (1) (para 11.1).
(4) Install nut (2). Torque nut (2) to 30 INCH-
POUNDS. Use torque wrench.
(5) Increase torque to aline cotter pin hole, but do
not exceed 40 INCH-POUNDS.
(6) Install new cotter pin (5).
NOTE
Do not apply sealing compound to spheri-
cal bearing.
(7) Apply sealing compound to head of bolt (1)
and nut (2). Use sealing compound
(item 178, App F).
d. Inspect (QA).
e. Perform directional flight control rigging
maintenance
operational
check
(TM 1-1520-238-T).
f. Install access fairings L530 and L540 (para
2.2).
END OF TASK
M04-1772-7A
3
4
5
2
1
6