TM 1-1520-238-10
Change 5
4-77
3. TEST pushbutton – Press
a. AUDIO control – Adjust as desired during
long or short count.
b. Listen for synthetic voice long or short
count. SELF-TEST SET VOLUME 1, 2, 3, 4,
5, 6, 7, 8, 9, 10, 11, 12.
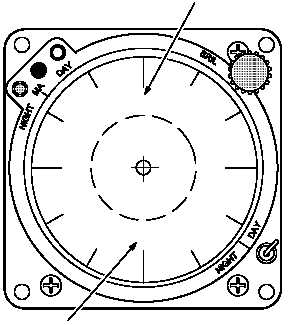
c. The RW display will show specific numbers,
operational flight program (OFP) at the
twelve o’clock position and the emitter iden-
tification data (EID) at the six o’clock posi-
tion (fig 4-25).
NOTE
OFP and EID numbers should be correct for
mission or geographical location.
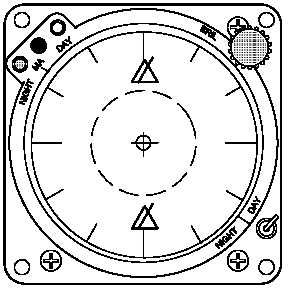
d. The RW display will then show a RW receiv-
ers check. For a good self-test the RW dis-
play will show two triangles with slashes at
the six and twelve o’clock positions (fig
4-26). Snowflakes will appear at the two,
four, eight, and ten o’clock positions. All will
flash if the laser detecting set is not installed
and OFP is lower than 23.9. Otherwise,
snowflakes will be steady. This is a normal
indication and does not affect RW system
performance. If the laser detecting set is
installed a good self-test will display a
steady snowflake in each quadrant. Faulty
quadrants are displayed with a flashing
snowflake.
e. Listen for synthetic voice message at end of
self-test. A good self-test ends with the
message: APR-39 OPERATIONAL.
f. A bad self-test ends with the message:
APR-39 FAILURE.
g. After completing system self-test, verify that
the + symbol is shown at the center of the
RW display. The + symbol shall be dis-
played anytime the system is ON.
4. Equipment off.
PWR switch – OFF. Pull PWR
switch handle out to disengage lock.
M01-
XXX.X
XXX
EID
OFP
Figure 4-25.
Radar Warning OFP and EID Display
M01-0307
Figure 4-26.
Radar Warning Receiver Check
Display