TM 1-1520-238-23
5-85
5.15.
MAIN ROTOR BLADE ELECTROSTATIC DISCHARGER DISASSEMBLY/ASSEMBLY – continued
(4) Apply light clamping pressure to hold brack-
ets (4) and (5) in place. Use C clamp and
wood blocks.
(5) Remove excess adhesive squeeze-out from
around edges of brackets (4) and (5). Use
cloth (item 52, App F).
(6) Allow adhesive to cure for a minimum of
24 HOURS at room temperature.
(7) Remove C clamp.
(8) Featheredge any cured adhesive squeezeout
from around edges of brackets (4) and (5) by
sanding in a spanwise direction. Use paper
(item 134, App F).
(9) Install rivet (9) (TM 1-1500-204-23).
c. Touch-up paint all surface areas adjacent to
brackets (4) and (5) where paint was originally
removed (TM 55-1500-345-23).
NOTE
Perform step d only if replacing fitting.
Otherwise proceed directly to step e.
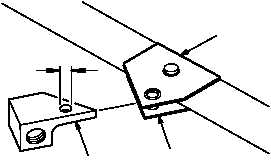
d. Drill a 0.095 to 0.098 INCH diameter hole in
fitting (3).
(1) Position fitting (3) between bracket (4) and
bracket (5).
(2) Mark location of rivet hole on fitting (3) from
rivet hole on brackets (4) and (5).
(3) Remove fitting (3) and drill a 0.095 to 0.098
INCH diameter rivet hole through fitting (3).
Use pneumatic drill and twist drill.
GO TO NEXT PAGE
M04-2308-10
5
4
9
WOOD
BLOCK
C CLAMP
5
M04-2308-11
3
4
0.095 IN
TO 0.098 IN