TM 1-1520-238-23
16-26
Change 8
16.5.
PYLON RACK DISASSEMBLY/ASSEMBLY (AVIM) - continued
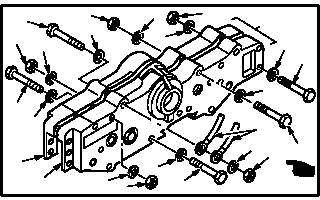
b. Separate pylon rack (4) into left mounting
bracket (5) and right mounting bracket (6).
(1) Remove three nuts (7) and washers (8) from
bolts (9).
(2) Remove three bolts (9) with washers (8).
(3) Remove nut (7) and washer (8) from bolt (9)
(4) Remove electrical leads (9.1) from bolt (9).
(5) Remove bolt (9) and washer (8).
(6) Remove nut (7) and washer (10) from bolt
(11).
(7) Remove bolt (11) with washer (10).
(8) Remove six nuts (7) and washers (8) from
bolts (12).
(9) Remove six bolts (12) with washers (8).
(10) Remove nut (13) with washer (14) from bolt
(15).
(11) Remove bolt (15) with washer (14).
(12) Separate pylon rack (4) into left mounting
bracket (5) and right mounting bracket (6) by
tapping and prying evenly.
NOTE
The right mounting bracket contains the
hook assemblies.
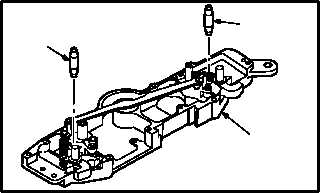
c. Remove two bumpers (16) from mounting
bracket (6).
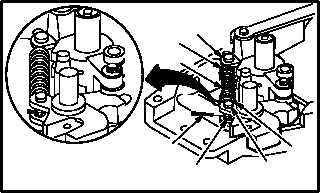
d. Install temporary cotter pin (17) through hole
at end of rod (18) to retain springs (19) and
(20) and spacer (21) on forward hook assem-
bly (22) during removal.
(1) Compress springs (19) and (20) until the hole
in rod (18) is extended beyond pin (23).
(2) Insert pin (17) through hole in rod (18).
GO TO NEXT PAGE
7
8
M04-2704-3A
14
15
12
4
7
10
7
5
6
13
14
8
8
10
11
7
9
8
9.1
8
8
9
M04-2704-49
16
16
6
M04-2704-74
17
18
19
20
21
22
23


