TM 1-1520-238-23
Change 5
10-323
10.71.
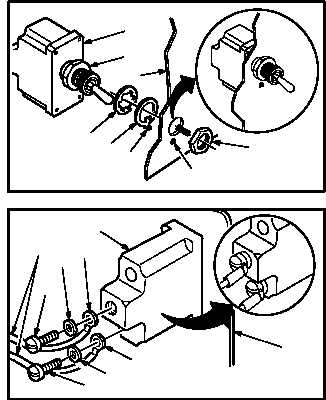
REFUELING PANEL SWITCH REPLACEMENT – continued
(3) Remove nut (7).
(4) Remove switch (1), lockwasher (8) and tab
washer (9) from back of panel (2). Discard
switch.
10.71.4. Cleaning
a. Clean removed and attaching parts and sur-
faces (para 1.47).
10.71.5. Inspection
a. Check wires for damaged connections, cuts,
and wear (para 10.1).
b. Check panel for cracks, dents, and damaged
hardware. None allowed.
10.71.6. Installation
a. Install new switch (1) on panel (2).
(1) Install switch (1) through lockwasher (8) and
key washer (9) so that tab (10) seats in locat-
ing hole (11).
(2) Adjust length of switch (1) through panel (2).
Use adjustment nut (12).
(3) Install nut (7).
b. Attach two identified wires (3) to switch (1).
(1) Install two screws (4) through lockwashers
(5) and terminal lugs (6) into switch (1).
c. Perform continuity test on two wires (3). Use
multimeter (TM 55-1500-323-24).
d. Inspect (QA).
END OF TASK
M04-3755-3
8
7
2
9
1
M04-3755-4
8
2
9
1
12
10
7
11
M04-3755-5
6
5
4
3
2
4
5
6
1