TM 1-1520-238-23
11-663
11.150. PILOT STATION DIRECTIONAL BELLCRANK BRACKET ASSEMBLY
REMOVAL/INSTALLATION – continued
11.150.4. Cleaning
a. Wipe removed and attaching parts with a
clean rag.
11.150.5. Inspection
a. Check removed and attaching parts for dam-
age (para 11.5).
b. Check removed and attaching parts for corro-
sion (para 1.49).
c. Check all installed bushing(s) and/or bear-
ing(s) for wear (para 11.5).
d. Check nutplates and threaded inserts for
stripped thread damage (TM 1-1500-204-23).
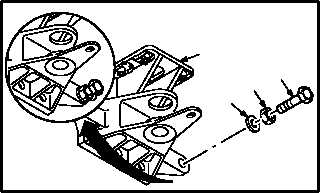
11.150.6. Installation
NOTE
If the bracket was replaced, perform step
a.
a. Install two bolts (8), nuts (9), and washers (10)
on bracket (1).
(1) Install two bolts (8), nuts (9), and washers
(10) on bracket (1).
(2) Adjust two bolts (8) to obtain lengths re-
corded in paragraph 11.150.3, step b.
(3) Tighten two nuts (9).
(4) Verify bolts are at lengths recorded in para-
graph 11.150.3, step b.
(5) Lockwire bolt (8) and nut (9) together (two
places). Use wire (item 224, App F).
GO TO NEXT PAGE
M04-4411-7
8
10
9
1