TM 1-1520-238-23
11-88
Change 2
11.12.
AFT LONGITUDINAL BELLCRANK REMOVAL/INSTALLATION – continued
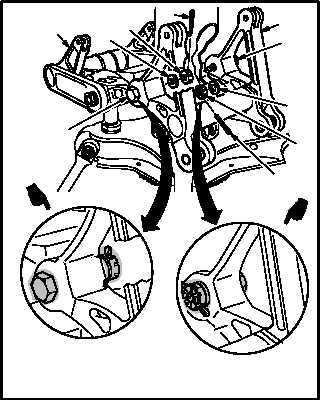
b. Install left side of bellcrank (9) on bellcrank
(2). Torque bolt (15) 300 to 700 INCH-POUNDS.
(1) Install washer (17) and nut (16) on bolt (15).
(2) Hold nut (16). Use open end wrench.
(3) Torque bolt (15) to 300 INCH-POUNDS. Use
socket, adapter, and torque wrench.
(4) Increase torque to aline cotter pin hole, but do
not exceed 700 INCH-POUNDS.
(5) Install new cotter pin (14).
(6) Apply sealing compound around bolt (15)
head, washer (17), and nut (16). Use sealing
compound (item 176, App F).
c. Install right side of bellcrank (9) on bellcrank
(2). Torque bolt (11) 300 to 700 INCH-POUNDS.
(1) Install washer (13) and nut (12) on bolt (11).
(2) Hold nut (12). Use open end wrench.
(3) Torque bolt (11) to 300 INCH-POUNDS. Use
socket, adapter, and torque wrench.
(4) Increase torque to aline cotter pin hole, but do
not exceed 700 INCH-POUNDS.
(5) Install new cotter pin (10).
(6) Apply sealing compound around bolt (11)
head, washer (13), and nut (12). Use sealing
compound (item 176, App F).
GO TO NEXT PAGE
M04-1719-7A
9
11
13
12
10
14
16
17
2
15