TM 1-1520-238-23
Change 8
11-116.1
11.18.
SECONDARY MAIN ROTOR SCISSOR REMOVAL/INSTALLATION – continued
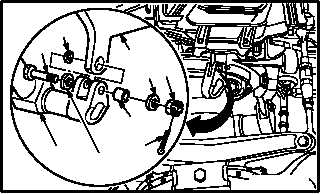
c. Install other side of scissor (1).
(1) Install bearing (8) between scissor (1) and
shoe (2).
(2) Install bushing (9) in scissor (1) and shoe (2).
CAUTION
Threads of bolt and nut shall be clean
and compound free. Contaminated
threads can cause improper torque,
which may cause damage to flight control
system.
(3) Apply a light coat of corrosion preventive
compound to shank of bolt (6). Use corrosion
preventive compound (item 62A, App F).
(4) Install bolt (6) through washer (7) (with coun-
tersunk side of washer adjacent to bolt head),
scissor (1), bearing (8), shoe (2), and bushing
(9).
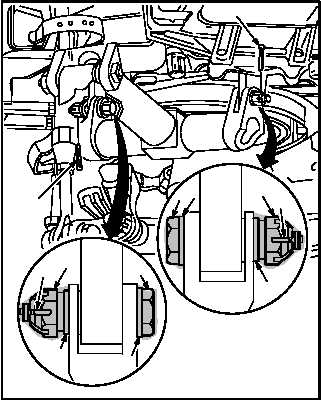
d. Torque nuts (4) and (11) 170 to 200 INCH-
POUNDS.
(1) Hold two bolts (6) and (13).
(2) Install nuts (4) and (11). Torque nuts (4) and
(11) to 170 INCH-POUNDS. Use torque
wrench.
(3) Increase torque to aline cotter pin hole, but do
not exceed 200 INCH-POUNDS.
(4) Install new cotter pins (3) and (10).
(5) Apply sealing compound around bolt heads
(6) and (13), washers (7) and (14), nuts (4)
and (11), and washers (5) and (12). Use
sealing compound (item 176, App F).
GO TO NEXT PAGE
2
5
4
8
6
1
7
9
3
M04-1723-6
M04-1723-7B
6
4
3
3
10
10
11
13
5
7
14
12